20120811

DEAD BREAD LIVES AGAIN AS A SAUSAGE STRATA!

 
I don't know about you but I am always ending up with tail ends of loaves of bread.  Those last 2 or 3 pieces that are too dry to use for a sandwich.  If the bread is plain I'll dry it more in the oven, grind it up and use it as bread crumbs.  (Seriously? You're still paying for bread crumbs??) If it has seeds or nuts or whatever on the crust I'll freeze it until I get enough to turn it into a strata!

What is a Strata? It's a layered casserole dish similar to a quiche or frittata, made from a mixture which mainly consists of bread, eggs and cheese though it may also include meats or vegetables. The usual preparation requires that the bread be layered then the custard mixture poured over it - hence the name "strata".

I prefer using a method more similar to a savory bread pudding where the bread is broken up into pieces and soaked in the custard mixture before placing it in the baking dish. It's just a personal thing, I think the bread crust gets more evenly distributed this way.

A strata is traditionally served warm, right out of the oven BUT since I am into "tiny foods" and always looking for new happy hour snacks, I have been known to cut a strata cold.  I simply cut pieces into 1" cubes, poke a cocktail pick in them and serve them up chilled with a matching dipping sauce for a cocktail snack!

Strata Trivia: The earliest strata recipe known is a 1902 recipe for Cheese strata, a gratin of layers of bread, white sauce, and cheese, but no eggs.

My latest strata recipe is my
SEXY SAUSAGE STRATA
(Why sexy? Because it makes you feel all warm and happy inside and afterwards you're very satisfied!)

INGREDIENTS
1 Loaf "Dead" (Dry) Bread
4 Eggs
1-1/2 C. Milk
3 Sweet Italian Sausage Links
1/2 C. Diced Onions
8 Oz. Small Curd Cottage Cheese
8 Oz. Shredded Cheddar
Any Leftover Cheese*
3 Tbsp. Melted Butter
2 Tbsp. Yellow Mustard
1 Tsp. Pollen Ranch Spicy Fennel Sea Salt
Black Pepper to Taste
Spray Cooking Oil
Extra Virgin Olive Oil (EVOO)

TOOLS
Measuring Cups and Spoons
Large and Medium Mixing Bowls
Large Saute Pan
13x9x2 Baking Dish
 
DIRECTIONS
  1. Spray a 13x9x2 baking dish with cooking oil spray.
  2. Break the bread into large chunks.
  3. Spray your saute pan with some cooking spray, crumble in the Italian Sausage and cook until nicely caramelized.
  4. Remove the cooked sausage to drain on paper towel, set aside in the fridge but leave sausage grease and bits in pan.
  5. Add your diced onions to the sausage fat, add about a tablespoon or more of olive oil and cook until caramelized, remove and drain on paper towel.
  6. Beat the eggs, milk, melted butter, salt, pepper and mustard in a large bowl.
  7. Fold in the shredded cheese and the cottage cheese. *(I will also usually add any slices or parts of packages of shredded cheese I have as well just to get rid of my odds and ends!)
  8. Next fold in the sausage and caramelized onions and gently blend all the ingredients until well incorporated.
  9. Pour, scoop or spoon into your greased baking dish.
  10. Cover your dish with plastic wrap and set in the fridge to soak a minimum of four hours, best overnight.
  11. To Bake, preheat oven to 350°F then bake your Strata for 50 minutes to one hour or until a knife tip comes out mostly clean.
Serve this up with a lovely fresh Spring greens salad with a honey mustard dressing (which I also use as a dipping sauce for the strata) and one of my yummy Champagne Martinis!
 

Follow me on Twitter
Friend me on Facebook
Pinterest Me!

20120804

PEPPERED ORANGE POT DE CREME AU CHOCOLAT - Sin a Little!

POT AU CHOCOLAT
(Pot de Creme au Chocolat)
with Chocolate Covered Mandarin Oranges,
Orange Zest, Fleur de Sel & Pink and Black Pepper

I absolutely crave a nice Pot au Chocolat every once in a while. It's like a gourmet pudding on chocolate crack!  It's so rich, thick, creamy and decadent that you can actually feel your halo floating away from you as you indulge in the sinfulness of each spoonful.
Pot au Chocolate is not hard to make but I have an even easier recipe for whipping one up that, frankly, I use most of the time!  It requires only a few tools and ingredients and just a few minutes to make - though you will need a few hours (at least 4) for it to properly set up.
 
I often take my basic Pot de Creme au Chocolat recipe and doll it up depending on my mood of the moment. Sometimes I add a little espresso, salted caramel, sometimes a bit of booze, maybe a few candied nuts - whatever happens to strike my taste fancy of the moment.
Last night I wanted orange infused chocolate so here is what I came up with:
 
Recipe for The Diva of Tiny Foods
PEPPERED ORANGE POT DE CREME AU CHOCOLAT
 
INGREDIENTS:
1/2 Tsp. Orange Zest
6 Oz. Semi-Sweet Chocolate Chips or Pieces
3/4 Cup of Half & Half
One Egg
1/8 Tsp. Fleur de Sel
Pinch of Pink Peppercorns, Ground
Pinch of Black Peppercorns, Ground
1 Tbsp. Sugar*

GARNISH
6 Mandarin Orange Slices, Drained and Dried
1/3 Cup of Dark Chocolate Chips or Pieces
Whipped Cream
Dusting of Black Pepper & Fleur de Sel
TOOLS:
Measuring Cups & Spoons
Blender
Small Microwavable Glass
Small Microwaveable Cup
Microwave
2 Custard Cups
 
DIRECTIONS:
1. Put the 6 ounces of semi-sweet chocolate chips, the egg, the orange zest, the 1/8 Tsp. of Fleur de Sel and the two pinches of the peppers into your blender. If you want it sweet you may also add the sugar here. I do not use the sugar as I prefer the slight bitterness of the semi-sweet chocolate.
2. Heat your half & half in the microwave to scalding. This is about 2 - 3 minutes depending on the power of your microwave. You do not want the cream to boil but you want it steaming.
3. Turn your blender on to grind and slowly (through the hole, do not remove the lid) pour in the hot milk. Once the milk is all in, bring the blender up to puree.
4. Mix until the chips are completely melted in and the mixture is smooth, mine takes about 2 minutes or less.
5. Pour into your custard cups and place in the refrigerator to set up for a minimum of 4 hours.
6. Prepare your chocolate covered mandarin slices by melting the 1/4 cup of dark chocolate chips/pieces in a small cup then dipping in half the mandarin slice. Place on waxed paper and refrigerate until serving time.
7. At serving time top your Peppered Orange Pot au Chocolat off with some nice whipped cream, place your chocolate covered mandarin slices on top then dust the whole dish with a bit more of the peppers and the salt and serve!

This recipe makes 2 really full custard cups of yummy chocolate sinfulness, with a little extra left over.  (I poured the extra into a shot glass and had a little "sneak" taste after an hour.) You can also fill 4 espresso cups with this recipe which is a perfect serving for after a meal as it's very rich!

This is a really easy and impressive dessert to serve your guests and it takes you only a few minutes to create!  Try it out and let me know about some of your versions!

"God gave the angels wings, and he gave humans chocolate." ~ Author Unknown


Follow me on Twitter
Friend me on Facebook
Pinterest Me!

20120720

SALAD PIZZA - Why dirty two dishes??


THE SALAD (Margharita) PIZZA
 
Say what? A salad pizza? Why not, we eat pizza, we eat salad and lots of times we eat them together, right? So, why should I mess up two plates to enjoy them? Besides, if you've read this blog at all you know I'm a "lazy gourmet", I love good food but I don't like to spend all day making it or cleaning up after it.  I'm single, I'm self-employed and I work practically 24/7.  I'm always looking for cooking shortcuts.

Last night I was really hungry, it was 8:30 pm, I wanted to settle down to watch the premiere of the tenth season of Project Runway and munch on something good while I did it.  I wanted a Margherita Pizza but, because I'm lazy and work all the time, I didn't have the exact ingredients to make one. What I did have on hand was a great store brand garlic rosemary pizza dough, an assortment of shredded cheeses, some nice baby spinach, my fresh basil plant, a leek and some cute little heirloom tomatoes. Close enough!

Here's what I did:

Preheated the oven to 450 degrees.
Spread the pizza dough onto a lightly greased baking sheet.
Sprinkled a nice layer of cheese on top.
Popped it in the oven for 12 minutes.
Chopped up the baby spinach and fresh basil leaves.
Sliced up some nice thin pieces of leek.
Quartered up my baby heirlooms.
Mixed the greens up with some EVOO, Balsamic, splash of  orange juice.
Seasoned with sea salt, pepper & a dash of dried oregano.

By the time my salad was chopped up and ready and I had turned off the computer and turned on the TV, my pizza bread was baked and ready.  I was planning on putting the salad in a bowl and eating the pizza bread with it but when I cut the bread I took a small piece and threw some of the salad on top for a taste and it was a perfect little bite! Why bother with a fork? I tossed the salad on top of the pizza bread, grabbed my Project Runway "Make It Work" Martini and settled in to watch my beloved Tim Gunn and enjoy the cat fights on the runway.

 Tim, you would have been proud of me, I "MadeItWork" !!


Follow me on Twitter
Friend me on Facebook
Pinterest Me!

20120629

Grilled Peanut Butter and Chocolate Sandwich Recipe


GRILLED PEANUT BUTTER & CHOCOLATE SANDWICH
A little midnight snack to make your tummy smile.

At 11:30 pm last night I was starving.  I wanted something sweet, salty, crunchy and chocolate-y and I didn't want to go to the trouble of making cookies or turn on the oven for cupcakes either.  So I dug around in my cupboard and saw a jar of peanut butter (didn't want a PB&J) and a lovely jar of chocolate almond butter (light bulb is now over my head) and I decided a quick little grilled sandwich sounded really good!

It was quick, easy and delicious and satisfied all the cravings mentioned above. In just a few minutes you have a really yummy snack on your plate!

DIRECTIONS FOR GRILLED PEANUT BUTTER & CHOCOLATE SANDWICH:

Cut the crust off of two slices of bread. Spread the peanut butter on one piece of bread and the chocolate almond (or hazelnut chocolate - Nutella, anyone?) spread on the other and slap them together - with the flavored butters inside, of course!  Don't spread it to the very edge or the butters will leak out all over your pan as you cook.
 Melt some butter in a non-stick skillet and sprinkle on just a bit of salt then place the sandwich into the pan on a medium heat to grill - just like a grilled cheese sandwich.
Add a little more butter and flip the sandwich to grill the other side.
When your sandwich is nicely brown on both sides, cut it into small triangles and plate up with a nice slice of orange or some other fresh fruit, shake a little powdered sugar on top and drizzle your fruit with a little chocolate sauce - or not, whatever floats your midnight craving boat!

Enjoy!


Follow me on Twitter
Friend me on Facebook
Pinterest Me!

20120607

CHEESE CRISPS - Easy, Tasty & Fillable!


CHEESE CRISPS aka FRICO

If you have shredded cheese, a non-stick saute pan, a spatula, a wooden spoon (optional) and five minutes you have a great snack option!

I was having a little fun with cocktails for World Gin Day (June 9th) and decided to deconstruct a classic gin martini for some fun.  There isn't much to a gin martini so when it was torn apart and presented in a different way my plate looked a little bare and I decided I needed a little snack alongside the elements of the martini.

I wanted something salty, crisp and really quick to do so I could get my photo done and the easiest, fastest little snack I know is Parmesan Crisps.  You simply throw some shredded Parmesan in a non-stick saute pan and melt it until it starts to crisp up then you pull it out, fold it into a fun shape and voila, snacks! (P.S. You can also throw some shredded cheese in piles on a silpat and bake them in the oven at 375 degrees for about 5 to 6 minutes.)

Only one problem, I didn't have any shredded Parmesan cheese!  But I did have shredded cheddar and it will do the same thing - in fact most hard cheese will!  And you know what's really cool?  If you roll them into a cylinder you can fill them with stuff!!!!!

Here's the process, step by step, in photos:

Over a medium-high heat,
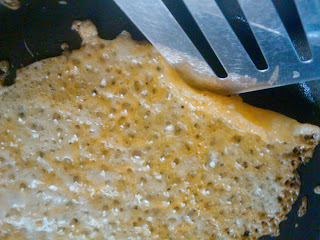
drop in the shredded cheese, let it be loose and lacy!

Let this sizzle away for about 3 minutes or until you
can see the edges start to brown and bubbles appear
on the top. You'll see a lot of fat oozing out of some
cheeses like cheddar! (Added benefit, this sweats out
some extra calories!)

Check one edge to see if it's browned enough to slip
your spatula under. If not wait a few seconds more.

When you can get the spatula under the whole crisp,
slide it under then flip and cook on the opposite side
for about another 30 seconds - 1 minute (depends on
the type of cheese you're using.)

Your cooked crisp will look somewhat like this - even
a little browner won't hurt but the more you cook them
the less mallable they are when you pull them out to 
shape them, so keep that in mind.

These are going to be hot so be careful, but grab your
cheese crisp out of the pan, dab it on some paper towels
to get the extra fat off and immediately roll it 
around a wooden spoon or dowel for a cylinder. For
a free form snack like the one at the top of the post,
simply scrunch it by hand into a fun shape.

You can fill the cylinder shaped crisps with any kind of
interesting stuffing that goes well with cheese!  Here I
stuffed it with some chicken salad, but I can imagine
putting in potato salad, mashed potatoes with chives
and sour cream - the list is endless!

 Now you have a fun shaped, crispy Cheese Crisp to
serve up for Happy Hour or as a nice crunchy element
to any soup or salad.  Repeat until you have all the
crisps you want!

Check out my
DECONSTRUCTED MARTINI 
which inspired these little nuggets of yum.


Follow me on Twitter
Friend me on Facebook
Pinterest Me!

20120601

National Donut Day - Donuts from Biscuits??


AND.....You can make this a savory snack as well!  Tonight I'm going to wrap the biscuit dough around a small piece of cheese then roll it in some salt and fun savory spices!!!


HAPPY NATIONAL DONUT DAY!!


Follow me on Twitter
Friend me on Facebook
Pinterest Me!

20120529

It's National Coq Au Vin Day!


May 29th is
NATIONAL COQ AU VIN DAY
 
Coq au vin (pronounced Coke-O-Van) is basically a braised chicken recipe with burgundy wine, lardon (salted pork or bacon), mushrooms and garlic.  It is French for "cock (rooster) with wine" and is a classic French dish with multiple variations depending on what part of the French countryside the recipe comes from.

Considered a peasant dish originally, because the traditional recipe often made use of any old barnyard fowl, the wine the poultry was marinated and cooked in was used to help break down the toughness of the aged bird.

It is said that there were versions of Coq Au Vin from as far back and ancient Gaul and that Julius Caesar was said to have brought the recipe for "Gallo al vino" back from the Gallic Wars! In modern history this dish is most often associated with the iconic Julia Child.

I do this most often these days in a crock pot but I do use Julia Child's recipe - it just seems somewhat blasphemous not to!

JULIA CHILD'S COQ AU VIN RECIPE


Before dinner a nice Pomegranate Martini and, another classic comfort food, Hot Cheese Puffs would be a nice starter for this meal!

Happy National Coq Au Vin Day - now you can eat like an Emperor!


Follow me on Twitter
Friend me on Facebook
Pinterest Me!
Related Posts Plugin for WordPress, Blogger...

Are My Recipe Cards Free to Download? Yes, please do - save them all, print them out and keep them or wrap them with a pretty ribbon and use as a gift! However, please do not use them on your blog, website or for any commercial purpose.

All postings and original art by PopArtDiva.com, copyright 2000-2019. This blog is for entertainment only. All links provided are for the convenience and amusement of the blog visitor only and not to be construed as endorsements of any form. Sharing recipes of my favorite foods and snacks.